BV517
Contents
- Introduction
- Physical Description
- Arduino
- Commands
- Screen
- Keypad
- Overlay
- ATFlash
- Creating Images
- Creating Fonts
- Advanced Topics
Introduction
This is a serial device that can be used for general input / output. It can be connected to a microcontroller and display fonts and images which the device can store on its own flash memory thus freeing up resources on the host.
There is a colour screen with 16 touch buttons. The on board microcontroller takes care of decoding the buttons and displaying images and fonts to the screen.
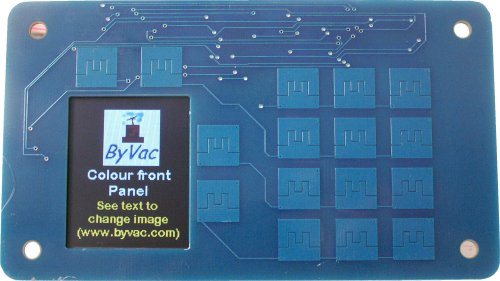
Physical Description
- Size 124 x 71 x 10 (L x W x H) The highest item is the connector, average height is 5mm
- Screen 128 x 160, portrait or landscape 26k colours
- 16 way touch keypad, 4 of wich are round the display ATM style
- ATFlash memory 1000 x 4096 bytes or 2000 x 4096 bytes (depends on model)
- Serial interface
- 2 spare GPIO
- Default Baud rate 115200
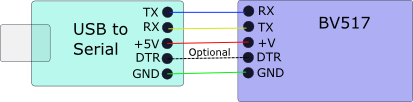
Connecting
| GND | |||
| Ground | GND | DTR | For resetting device |
| Output from regulator | 3.3V | V+ | 3.5V to 10V power supply |
| Spare GPIO | B | TX | Output |
| Spare GPIO | A | RX | Input |
The above is the details of the 2x5 way connector
The device can be connected to any terminal, 1 stop bit, 8 data bits, no parity and 115200 Baud. TX goes to RX on the terminal and RX goes to TX on the terminal. At switch on there will be a start up screen and the prompt is '>'. It is recommended that BvSerial (see using below)be used as this has a built in command for downloading fonts and images to the ATFlash.

The panel will fit exactly into an E77 box from m-r-s. If the box link is broken then look for the m-r-s store. Because the panel is so thin there is plenty of room. The above example has 4 x AA batteries and there is room for more.
Using
The device can be used with any other device that has a serial interface, for experimentation it can be connected to a USB to Serial device and commands entered directly at the keypad. This is also used for uploading images and fonts. After that it can be connected to the host device, Arduino for example.
NOTE: TX<>RX and RX<>TX. Any serial software will do but because of the built command to enable uploading of fonts and images BvSerial should be used. For Windows this is a stand alone exe file, it does not need installing, just unzip to a directory and double click the exe.

At the prompt, commands can be entered, for example cls() to clear the screen and txt("fred") to place text using the default font. In this way any device with a serial output (for the screen) and input (for the keypad) can control the device. It is worth experimenting with a few commands to get the feel of how it works.
An important part of the device is to be able to store images and fonts so these can be retrieved almost instantly. The flash is able to store 100's of these. For a description of ow to do that see the Saving to ATFlash topic below.
The software can even be added and updated, see the advanced topic below for details on that.
Arduino
The best way of using the device with the arduino is to use a soft serial port on the smaller devices and perhaps a spare uart on the larger devices. There is no need for a library as the commands are just simple serial commands.
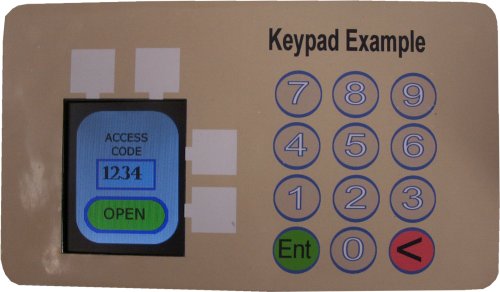
Door Lock Example
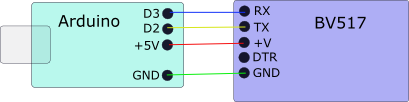
To give an idea of how it works a nano is connected as above.
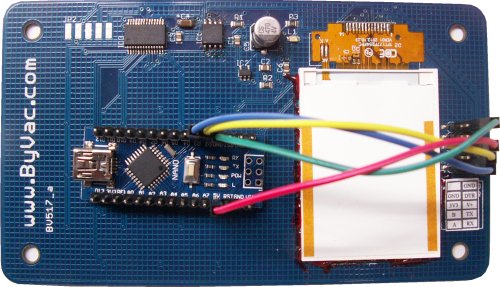
This is what it looks like at the back. Only 2 I/O wires are needed.
- BV517 Door lock example - Arduino sketch
The sketch uses the pre-installed images and fonts, see the 'Using' for how to download images and fonts. It works by presenting a background image and then an image over the top saying LOCKED.
When the uses enters any 4 digit code (no checking is done to keep the sketch simple). The locked image is changed for OPEN
Command Summary
This is the table of all of the associated commands, either the long or short version can be used.
| Short | Long | Description |
| txt("string") | ditext("string") | sends text in the current font |
| tps(r,c) | ditextpos(r,c) | Moves the text cursor to a row and column, the actual position is determined by the current font. |
| fon("name") | difont("name") | Makes "name.bff" the current font |
| hom() | dihome() | Moves current position to top left |
| beg() | dibegin() | Moves current position to begging of current line |
| pps(x,y) | dipixpos(x,y) | Moves current position to a given pixel location |
| asp(n) | diaspect(n) | Changes the orientation from the default 0 (portrait) to 1 landscape |
| bli(n) | dibl(n) | Turns on / off back light |
| fil(colour) | difill(colour) | Sets the fill colour (see rgb(r,g,b)) |
| str(colour) | distroke(colour) | Sets the stroke colour (see rgb(r,g,b)) |
| wid(n) | distrokewidth(n) | Sets width of stroke in pixels |
| inf(n) | diinfo(n) | Returns current status |
| cls() | dicls() | Clears screen, uses current fill colour, sets current x,y to 0,0 |
| pix(x,y) | dipix(x,y) | Places one pixel at given x,y location, uses stroke colour |
| lin(x,y) | diline(x,y) | Draws a line from the current position |
| box(x,y) | direct(x,y) | Draws a rectangle |
| cir(r) | dicircle(r) | Draws a circle |
| arc(sA,eA,r) | diarc(sA,eA,r) | Draws an arc |
| img("name",x,y) | diimage("name",x,y) | Displays a stored image at x,y |
| rgb(r,g,b) | rgb(r,g,b) | Gets a colour number, used in stroke and fill |
| lst() | atlist() | Lists the files stored on the AFFlash |
| aterase(a,b) | See advanced section | |
| era() | ateraseall() | Erases all of ATFlash |
| atfind("name") | See advanced section | |
| atdump(n) | See advanced section | |
| atload(n) | See advanced section | |
| atwrite(a,b,c) | See advanced section | |
| atread(a,b,c) | See advanced section | |
| atput(a,b) | See advanced section | |
| atget(a) | See advanced section |
Screen
There are three ways to get information onto the screen
- Using text
- Using basic graphic commands
- Using images
Text
This will display the "string" to the current position, the current position will then be the end of the string ' ready for the next string'. Note the double quotes are required.
Positions the current position to a new location given by row and column. The row and column are calculated using the current font information. See also dipixpos(x,y) for accurately placing text
Moves the current position to the top left, home position, see also dicls()
Moves the current position to the start of the current row
Sets the current font. The font is stored in ATFlash. NOTE the name is CASE sensitive and the extension (.bff) must also be specified.
Basic Graphics
Returns a colour value that is used to set the colour of the stroke or fill and may be used in some other commands. Red,green or blue maximum value is 63 for each. Thus white is rgb(63,63,63)
Sets the stroke colour which is the colour used for the colour of the characters and also the outline of any shape. The colour is obtained from the rgb(r,g,b) function and so this is also valid distroke(rgb(10,10,10))
Sets the width of the stroke for some shapes in pixels. It does not apply to fonts and characters.
Sets the fill colour of a shape and also the background when clear screen is used. The colour is obtained from the rgb(r,g,b) function and so this is also valid difill(rgb(10,10,10))
Sets the current drawing position (also applies to text). Most commands will update this position, for example when drawing a line the new current position will be the end of the line.
Draws a line from the current position to the new x,y position. The new current position is at the end of the line. This draws a single pixel line in the stroke colour but it does not use the stroke width.

Draws a rectangle the current position is the top left and the specified x,y is the bottom right. The rectangle is orthogonal. The new current position is given by the x,y specified in the command.
A is the current position before drawing, B is the specified x,y position and after drawing B will be the current position.

Draws a circle, radius is in pixels. The centre of the circle is the current position

Draws an arc. The centre point is set by the current position. The start angle is sA and the end angle is eA. The arc is drawn anticlockwise. In the above example diarc(0,90,30)
Images
Images are stored on the ATFlash, the name is case sensitive and the .bmp extension must be supplied. The x,y specifies the top left hand corner of the image and placing an image does not effect the current position.
Other
Information about fonts etc. Given a value n it will return information about that as the following table
| n | Details | Range |
| 1 | Maximum x Size | 128 |
| 2 | Maximum y Size | 160 |
| 3 | Current Orientation | 0 - 1 |
| 4 | Current x position | 0 - 128 |
| 5 | Current y position | 0 - 160 |
| 6 | Current fill colour | 0 - 65535 |
| 7 | Current stroke colour | 0 - 65535 |
| 8 | Current stroke width | 0 - 160 |
| 9 | Current font width | |
| 10 | Current font height |
Keypad Input
Pressing any key on the pad will output that key continuously to the TX pin. It is up to the host to capture and process the keys.
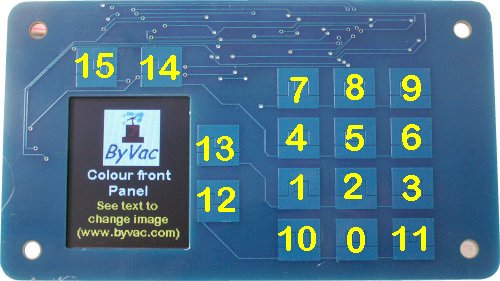
Default key numbers. The above numbers will be output by default. It is possible to change this and also change the way the keypad works by altering the firmware within the BV517.
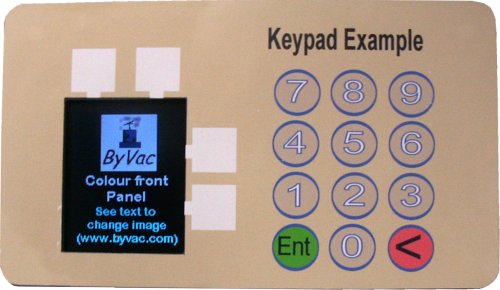
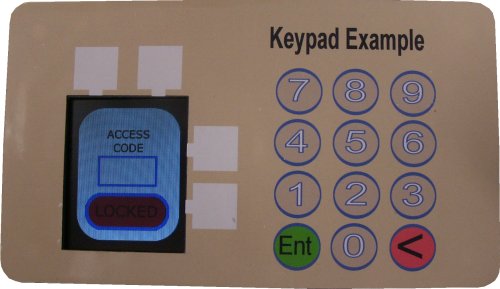
Creating an Overlay
The keypad is designd to be used with an overlay to suit a particular project. Not all keys may be needed for example. To help with this there is an inkscape drawing of the exact size.
The suggestion is to print on gloss sticky photo paper and then cover with sticky back transparent sheet. This will also provide protection for the display. It will also be possible to cover with 2mm acrylic, the key sensitivity may need adjusting but this can be done, see advanced topics.
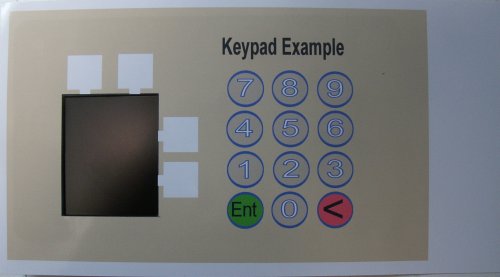
The overlay is bigger than the PCB, so first cut out the hole for the display, this will give a reference when sticking down, then cut round the PCB.
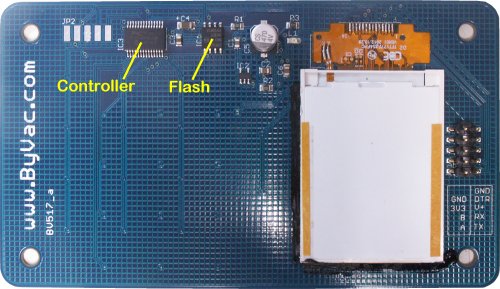
AT Flash
The device has installed a separate (from the microcontroller) flash and is capable of storing 1000 or 2000 blocks of data depending on the memory size. A block of data is 4k Bytes and typically a font will take 2 blocks and a full screen size image (128x160) will take 16 blocks and so for the larger size of memory we can store:
- 1000 fonts
- 125 full size images
Smaller images of course will take less blocks.
This will list the current contents of the AT flash similar to a directory listing, the list is in saved order.
Clears all of ATflash. NOTE: This command can take up to 1 minute
Saving to AT Flash
This is a simple file system and so before writing to flash the flash must be erased. However, as the flash is quite large then it is possible to write the information (duplicate) again which will effectively be an update only needing an erase when the flash is full. See below the del dup option is used.
There is a command in BvSerial that will upload an individual file or all of the files from a selected directory. See the using topic above for obtaining and using BvSerial. If using Windows then there is a stand alone exe, no installation is required.

Connecting the device to a serial port will reveal something like the above. The command to download images and fonts is .upm (dot upm)

To upload a single file use the brows button, to upload a whole directory just specify the directory name as above. The only relevant files are .bmp (image files) and .bff (font files)
- No Dup: If the file exists already on the AT flash then it will ignore that file. This is useful for re-uploading a directory when files have been added. Note that it cannot detect if a file is newer as it does not store the time and creation date.
- Dup: If this is checked then it will allow a duplicate name and store that. When using atfind, the first (oldest) image will be found)
- Del Dup: If the file exists on ATFlash then it will delete the file but the block will not be re_used, the file with the same name is added to the end of the flash. ** Use this to update an existing file
When loading a file a series of dots are shown indicating loading is taking place

Creating Images
Images must not exceed 128 x 64 in size otherwise they will be distorted. The image should be saved as a 24bit colour .bmp file format.
To change the 'splash screen' which appears on switch on, create an image 128x64 and call it 'default.bmp'. Use upm with Del Dup and save. The new opening screen will be the one that is now saved.
Creating Fonts
There are no built in fonts. The start up program looks for a font called "default.bff" in the ATFlash and uses that for the sign on screen. Fonts are created using CBFG.
CBFG web site (copy of CBFG can be found here)
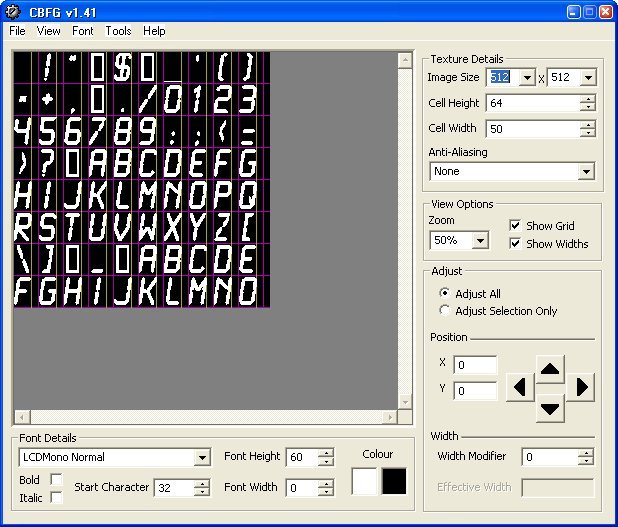
To create a user font, use the CBFG program and then save using the 24 bit Colour (RGB) option. This file can then be directly loaded into the ATFlash using the .upm option of BvSerial.
The fonts need to be saved as black as the stroke will take care of the colour. In the above font that is 60 high will take up half of the screen so some experimentation is needed.
Advanced
The device has been specifically designed to work with other microcontrollers to off load the burden of input and output. However it is a powerful microcontroller in its own right but has very little I/O. The following topics deal with re-establishing the front panel software and adding your own commands and functions.
For background information the firmware is written in ByPic and this can be modified and added to by you the user simply by writing functions.
Re Establishing Factory Firmware
The behavior of the device can be changed by writing or modifying the existing software. This may go wrong so it is possible to clear changes and start again, this only takes a few moments.
1) In BvSerial type fclear(0)
2) Use the ByPic IDE
3 Copy this, thefile http://www.byvac.com/downloads/BV517/bv517_d2.bas by selecting it and CTRL-C
4) In the editor select Scripts>Open URL in Clip this will then place the above script in an edit window
5) In editor press F4 which will re-instate the installed program, of course you can edit it first and even run programs from there.
If you have erased the AT flash then the media files are below.
- Factory media files
- Additional font files Some extra font files
Keypad
The keypad is controlled by 2 programs touch_11.bas and keypad.bas. These are included in the file above at the top of the file:
// #include "http://www.byvac.com/mBlib/flb/Library/2016/lib_io.bas"
// #include "http://www.byvac.com/mBlib/flb/Library/2016/lib_adc.bas"
// #include "http://www.byvac.com/downloads/BV517/touch_11.bas"
// #include "http://www.byvac.com/downloads/BV517/keypad.bas"
// #include "http://www.byvac.com/downloads/BV517/keypad_buf.bas"
Note there is a space on the last file (shown in red). This stops it loading. If buffered keypad is required then put a space in the other one and remove the space from this one.
** You can open these files by placing the cursor on the one to open and pressing F8
Changing the keypad sensitivity: This is set in touch_11.bas at the top of the file
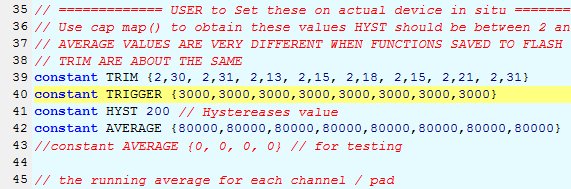
The values for TRIGGER (in yellow) represent the value at which the keypad channel will trigger and consider the key to be pressed (Each key has 2 channels). Reducing this value will increase the sensitivity but will also have the possibility of false triggering.
Experiment but change ALL of the values, try 1500. After changing the values type:
- flclear(1) // ** note 1 and not 0, removes BV517_d2.bas
- flclear(1) // removes keyad.bas
- flclear(1) // removes touch_11.bas
- Open all of those 3 files by selecting the URL as described above
- Click into touch_11.bas and modify
- press F4 (this will upload the file to the BV517
- type flsave("")
- type reset
- Click into keypad.bas
- press F4 (this will upload the file to the BV517
- type flsave("")
- type reset
- Click into bv517_d2.bas
- press F4 (this will upload the file to the BV517
- type flsave("")
- type reset
Touch any key to see the result on BvSerial
More ATFlash
- atfind("filename")
Used for finding a particular file, this is used by BvSerial to store images and fonts to flash the values returned are.
-1 atflash full
-4 atflash some error
-10000 or greater, block where file exists, i.e. add 10000 to this for the actual block
+10000 the next free block when file does not exist, i.e. subtract 10000 to find out actual block number.
- atwrite(s$,address,bytes)
Writes a string to the atflash the number of bytes. Note the address is the actual address from 0 to 4MB in the case of a 1000 block device so to write to the start of a particular block, multiply by 4096.
Example, write "Hello Fred" to the start of block 200
dim s$
atwrite(s$,200*4096,10)
To see if it is there use atdump(200)
- atread(s$,address,bytes)
Reads into a string, from the address of the atflash the number of bytes. Note the address is the actual address from 0 to 4MB in the case of a 1000 block device so to read from the start of a particular block, multiply by 4096.
Example: Read 20 bytes from block 200
dim r$
atread(r$,200*4096,20)
print r$ (assuming the data read was printable)
The first 4 bytes of a string are the size of the string and so if the string is dumped (dump(?r$,0)) then the contents of the string will start after the first 4 bytes.
- atdump(n)
Will dump the contents of atflash, n is the block number.
- atload(block)
This is used by BvSerial to load bytes into the atflash. It will write a block of data to the given block number. The data is sent via the com port with length first followed by the data, sending a length of 0 will terminate the transfer. For more information see def send_block(sp,data,dlen) in bvtools.py (part of bv serial).
** This command would not normally be used by the user.
- aterase(from,to)
Erases a block of blocks of flash. The from and to are specified as blocks. Before writing the block must be erased first. The minimum that can be erased is one block.
** WARNING If erasing blocks in the middle of data that would normally be listed with atlist() then using this command will effect the links and atlist() will not work as expected. It will also effect the atfind() command, the command will no longer be able to find block names, although the blocks will still be available.
Example: erase blocks 5 through 9 aterase(5,9)
- atput(mem_address,value)
Puts a single byte value to the ATFlash memory at a given address, the address is the absolute address not the block address an will range from 0 to 4,095,999 for 1000 block devices and double that for 2000 block devices. This along with atget() can be useful for storing data. NOTE that the memory to store data to must be erased first and the minimum erase sisz is 1 block (4096 bytes)
- atget(mem_address)
Returns a single byte at the given address (see also atput())
History
- Released March 2016
- Updated August 2016 to work with ByPic 2.32 and the new IDE